
Why would you need a Website? Do you have a blog, or are you in affiliate marketing?
Would you believe, when someone says to you that you can create a website in less than 90 seconds?

Now these days, you can create a free website in a blink. With that said many people still struggle and think building a Website involves coding and other technical obstacles.
Everyone can create a Website for free now and when you start a free website it is essential that you get the right training with it.
With the right Website Training, you save yourself a lot of headache and frustration.
To own your own Website has a lot of benefits.
What is a Website? How many pages should it have?
Well, a normal Website has normally 7 to 20 pages. These are the pages you must have when you have a website for business.
Basic Pages of a Website.
- About Us Page
- Terms and Condition Page
- Disclaimer Page
- Contact Page
- Home Page
- Blog Pages
- Products or Services
- Privacy Policy
- GDPR Access Request Page
You can create a Website as a personal task for storing and sharing your photos, celebrations, and adventure with family and friend. Websites can be used in many different ways.
There are different free websites available and if you create a website for a possible business adventure then make sure you are able to move the content and design over to a paid website host when you are ready.
You even can create a free website for your hobby and monetize it.
Even if it is just a small amount but wouldn’t it be great to have a little bit extra money on the side? You can start a small business with a blog, there are many ways how you can put your brand new free website to work.
Click the button below to create your free website today. Includes the 10 Certification Level training lessons.

The Mini Website in Internet Marketing.
If you create a free Mini Website-there are different uses for it. In the Internet world, the word “minisite” can refer to any number of different things. Some people call small niche article sites minisites, but that isn’t the general use of the word.
In Internet marketing, the word “minisite” is generally used to refer to tiny websites that are set up for the purpose to sell or promote a product or brand. The Minisite can be a free website or a paid website.
It can be an e-Book or some digital downloads like online courses, a brand introduction, a product promotion, a special sales offer, the possibilities are endless.
A minisite is not a Landing page or a Squeeze page. (it is similar to it)
How many pages has a Mini Website?
Many Minisites have between 2 -4 pages. Most of the time a single pitch page, plus a thank you page for the after orders.
When the Minisite has more than two pages than there is also an
#About us page
#Contact page,
#Privacy policy
#and the terms and condition page.
#Some of the real good Mini-Site have additionally added a frequently asked question page.
A quick intro on how quickly you can create a free Website or free Mini Website.
The first page of a Website is like a homepage where people land on when they click on your link. ( you have to decide what that should be, mostly it is a product page, but if you do it just for fun to store family pictures than make the about us page the first page.)

Over the years I have created a good amount of websites. Free ones and paid ones, and when you try the different free website builders like WordPress, Wix, Weebly, GoDaddy, Siterubix, each of them is different some have block builders and some do drag and drop.
All in all, they have all one thing in common for free websites you are restricted to the subdomain and restricted on what you can do. The website hosting is free but comes with limitations.
What you should keep in mind when signing up for a free website, you want to use a provider where you can move your site later on in case you decide to buy your own domain.
An extra plus of any website provider is if they offer free training. Below you find a link to a free website builder it is free and it comes with 10Certification level + 10 Affiliate Bootcamp Training lessons on how to set up the site and how you can monetize your site.

When I started out, I had no idea what kind of free website I should use. There were a few available but all required a bit more knowledge than I had.
Using WordPress is expensive. I signed up for the premium in the beginning and if you want to insert a plugin you need to upgrade to business, and that is expensive.
Lots of free website builders you can find now, the downside is they are free, yes but they will use your site for advertising and that is annoying.
Would you believe when I tell you that you can create Your Free Website in less than 90 seconds right now?
You can create a free Website in 5 simple steps and in less than 90 seconds. ( you are able later on, to build on and make it a more extensive website with more pages.
#Step one
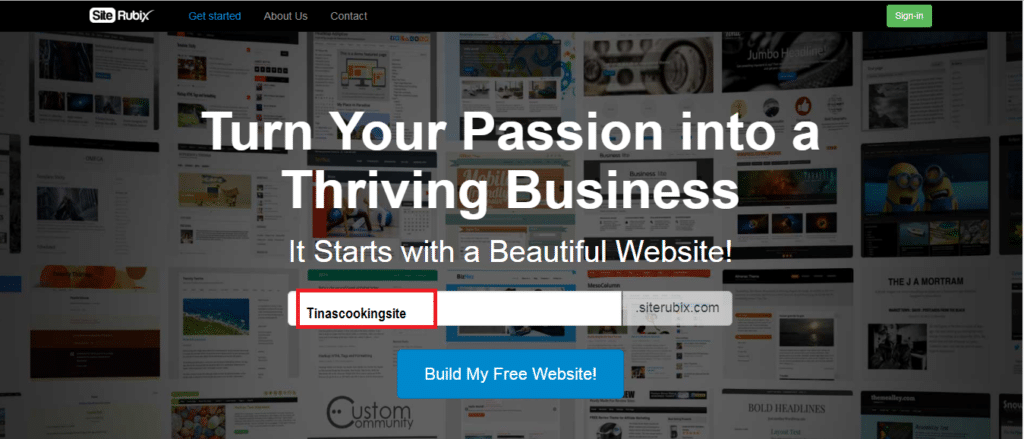
Sign up with siterubix ( it is free and it comes with free training, a free subdomain, and an SSL certificate)
think of a domain name ( for example Tina’s Cooking site) then click build my free website.
After you signed up you will be redirected to a sign-up page. This page will give you access to Wealthy Affiliate. Siterubix free website is hosted with Wealthy Affiliate. That will give you access to 2 free siterubix sites and to the free starter Training to build an online business.
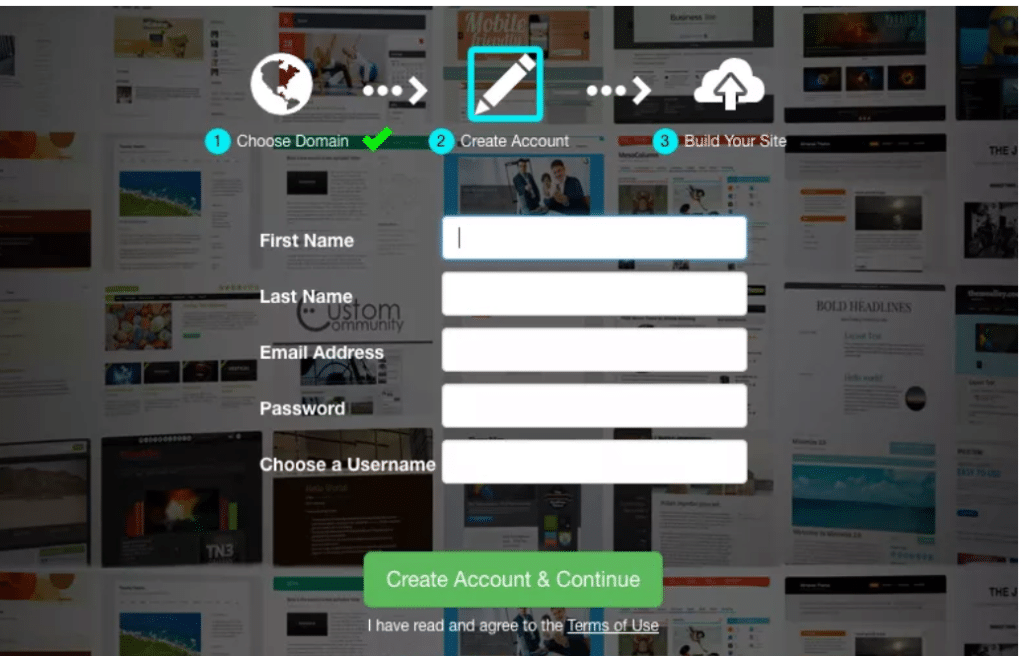
(There is no obligation for you to do the training or use any of the tools if you do not want to, but you will have to sign up for this free account if you are going to use the free website builder siterubix.)
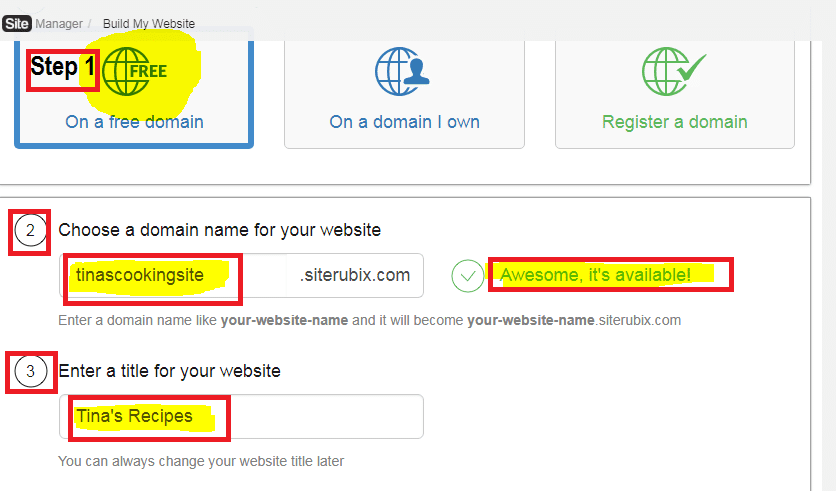
#Step 2
Chose a title for your Website. ( For the website I used “Tinascookingsite.” )
For the Title, I have chosen”Tina’s Recipes ”
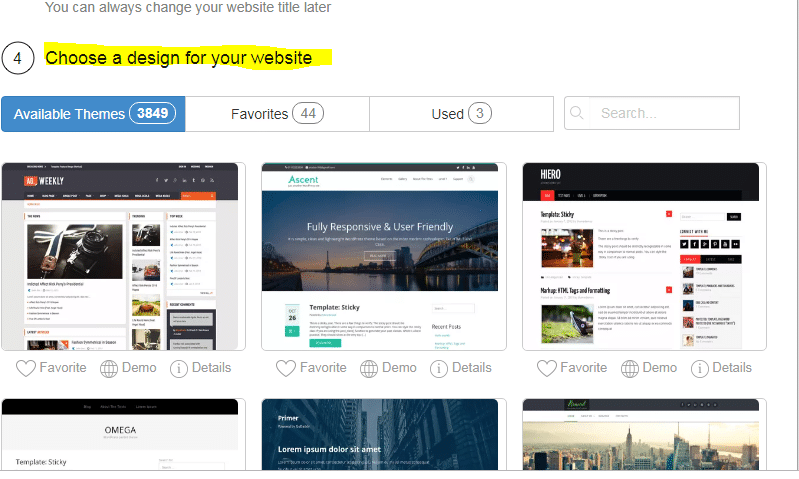
#Step 3
Choose the design of your Website
1. After you select your Theme ( Design) you can start building your site. Click on Design to start up your Website.
2. Please go to log in. Please note that with siterubix you will have 12 free designs it is enough when you are just starting off.
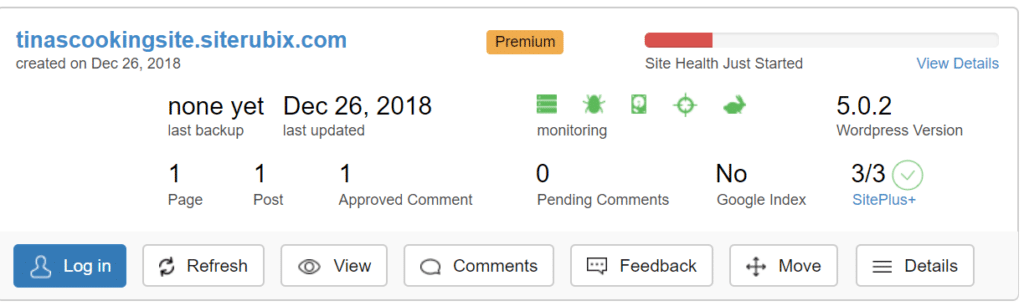
#Step 5: Go to login and log into your Mini website. Congratulation now you are the owner of a free Mini website. When you log into your Mini website you can choose two ways either direct through WordPress or through Wealthy Affiliate. Please note your site is created in a subdomain. https://tinascookingsite.siterubix.com
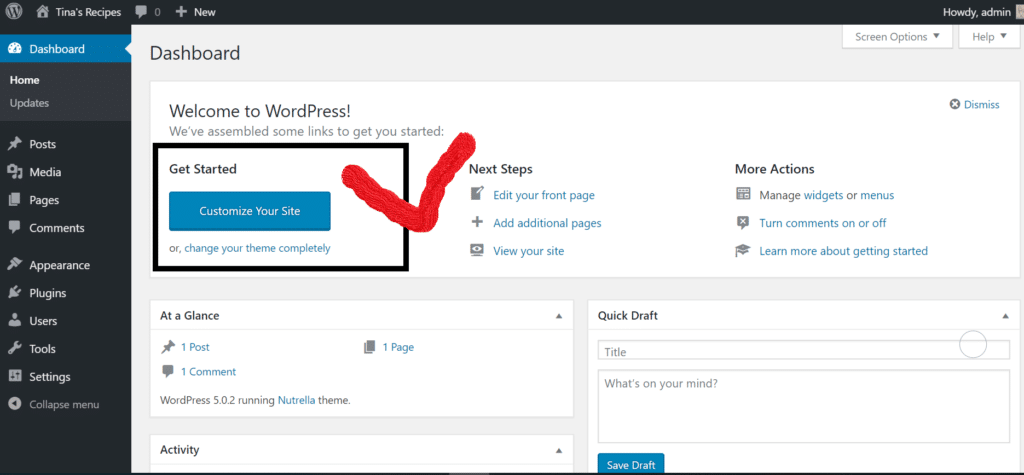
#Step 6: Customize your Site. When you are logged in you will come to the Dashboard page. Go to customize your Website.
Click on it and you can adjust now the site as you want it. ( see the picture below) You are done. You are now the proud owner of a free Website and a subdomain. Before we get started with the Training on How to customize your site, I like to show you some benefits of the Site- Rubix builder.
Before we continue, I will in short highlight some of the exciting features that Siterubix has to offer. If you not yet have signed up then you can do it here .
Lots of benefits for the Free Website Site Rubix
Below I will briefly highlight some of the great features that Siterubix has to offer, and why I recommend it as a free website builder.
- It is absolutely free
- It is very easy to set up ( 90 seconds)
- Quick and guided set up ( nothing can go wrong)
- No HTML coding required
- It comes with an SSL certificate
- Quality Hosting from Wealthy Affiliate
- Spam Protection and Server Monitoring
- You get a free account with Wealthy Affiliate ( set up does no credit card required)
- It comes with a free amazing bonus you get the free starter Training program.
- #The first 10 training lessons on how to set up a Website
- #Site Support 24/7 ( this is very important)
- best of all it is mobile friendly.
- #You get the training on how to create and monetize your website
- #how you can rank on google.
- #Stop! don’t say no I don’t need all that, keep an open mind it does not cost you anything.
![]()
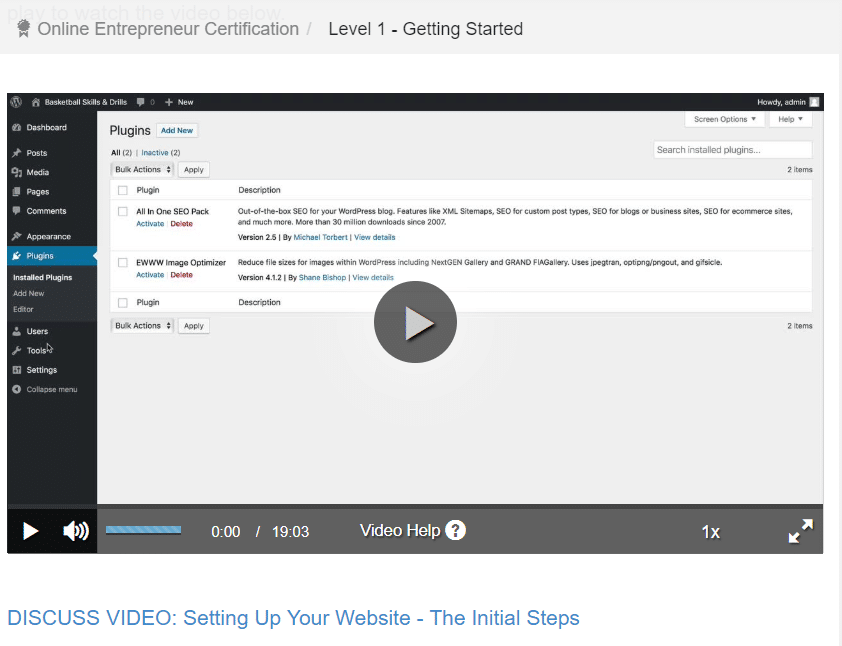
Below is a picture of where you can see the training in setting up your website. This is training number 1.
Getting started. You will not be alone in setting up all this by yourself, in general, it is not difficult but I know things can become overwhelming and we start to shut down. Be assured you are in the right hands with the training here in setting up your site.
You can always drop me a line or shout out to me as I am a member of Wealthy Affiliate and my member name is Spurway.
Remember when I talked at the beginning about the Privacy Policy. Well, the siterubix set up comes with the privacy policy draft you only need to adjust as you want it, and it comes with the plugin, “All in one SEO, Classic Editor and the EWWW Image Optimizer. “
When you are new to creating a website you will not have much of an idea about these things, so it is made easy for you to follow through. If you are wondering if there is a paid version of Wealthy Affiliate then I can say yes.
A Short Tutorial of how to customize your Website.
Training Video is at the end of the page.
We continue …. you are now on your Dashboard page where you can see the “Welcome to WordPress “and the blue bar that says customize your site. Please click on customize your site.
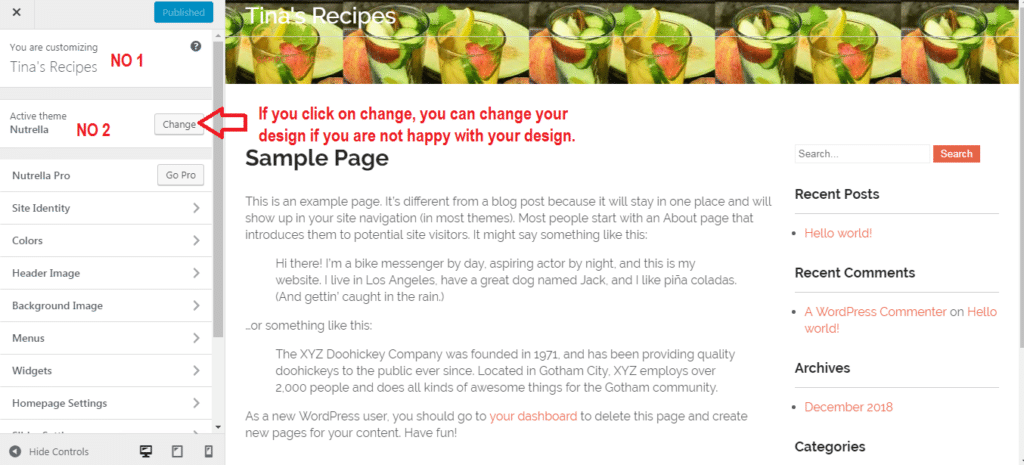
You will come to the customize page that looks like this for me. Don’t panic your page will look a bit different because you have chosen a different design. When you click on change ( No 2) you will be able to change your theme if you are not happy with it. That is up to you. Just don’t change too often it is not good for your site.
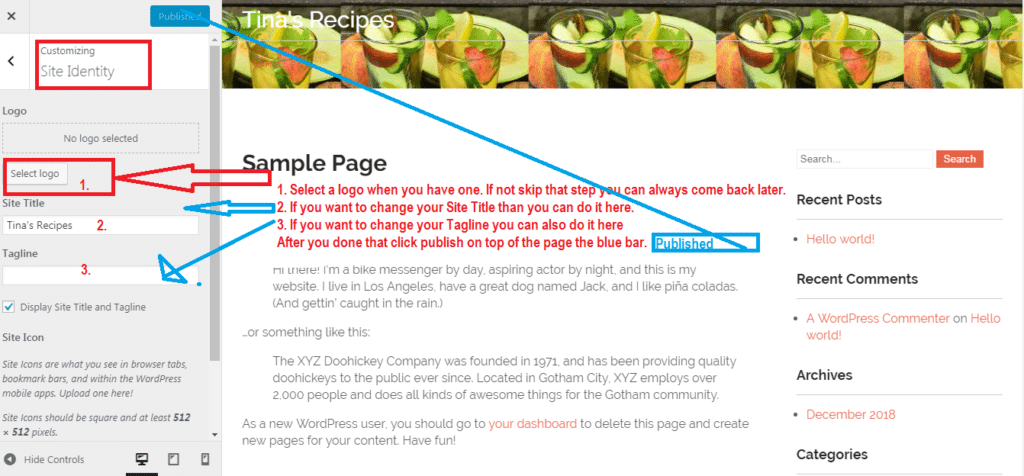
Site Identity in SiteRubix. It is the same as a Word Press dashboard.
When you click on Site Identity you will be able to insert a logo if you have one. If not and this is a family site with photos use one of your family.
- Select a logo when you have one. If not skip that step you can always come back later.
- If you want to change your Site Title now is the time.
- If you want to change your Tagline you can do it here.
- What you always have to remember is that you need to click on the published button after you are finished otherwise your changes will not be saved.
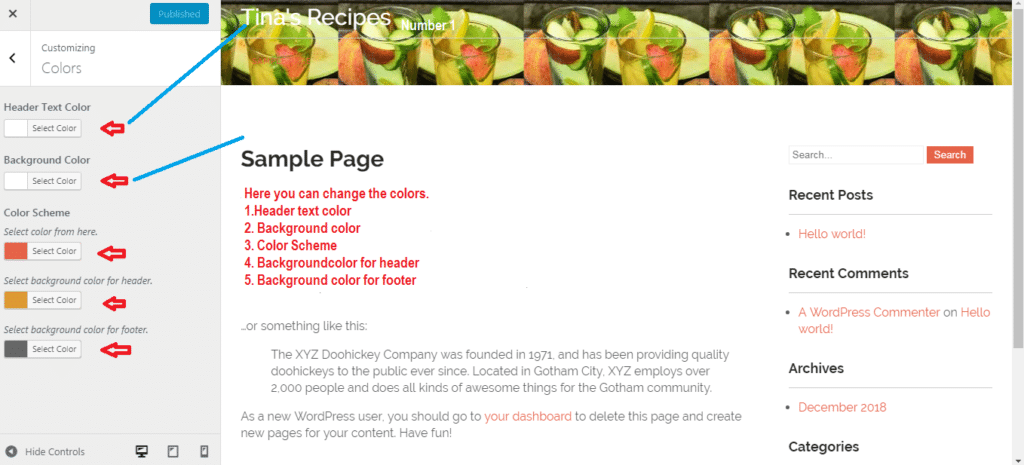
How to change the colour scheme on your Siterubix Site
Here you can change the colours scheme of your site. Just be aware a white background is less distractive.
Header text colour: this depends on your picture you need to change the colour that you can read your Site Title and Tagline.
Background colour: I normally choose white due it is less distractive. But of course, you can choose whatever you want, and suits your site best.
Colour Scheme: That comes with the Theme but you are able to change it, just make sure it is matching with the overall look of your site.
Background colour for the header
Background colour for the footer
Remember whenever you make changes, please click on the published button before you continue.
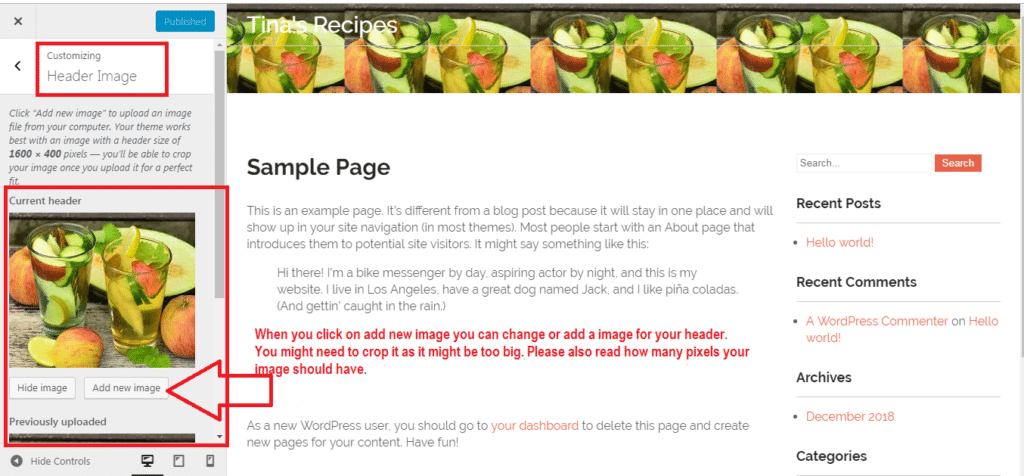
Header Image in your Siterubix Site
You can upload your own header image. Please click on upload image then go to upload from your computer. I guess your media library is still empty as your site is new. The Media Library will store all the pictures you upload on your site. When you come back later on it is easy to use the images again.
Please make sure that your image is according to the header size. Mine, for example, is 1600×400 pixels. You will be able to crop your image once you upload it for a perfect fit. You can also skip cropping. Some Headers have a slider, and you can upload up to three or four images, they rotate in your header. If you have 3 images, you can upload 3 images.
Again when finish uploading your image please click publish.
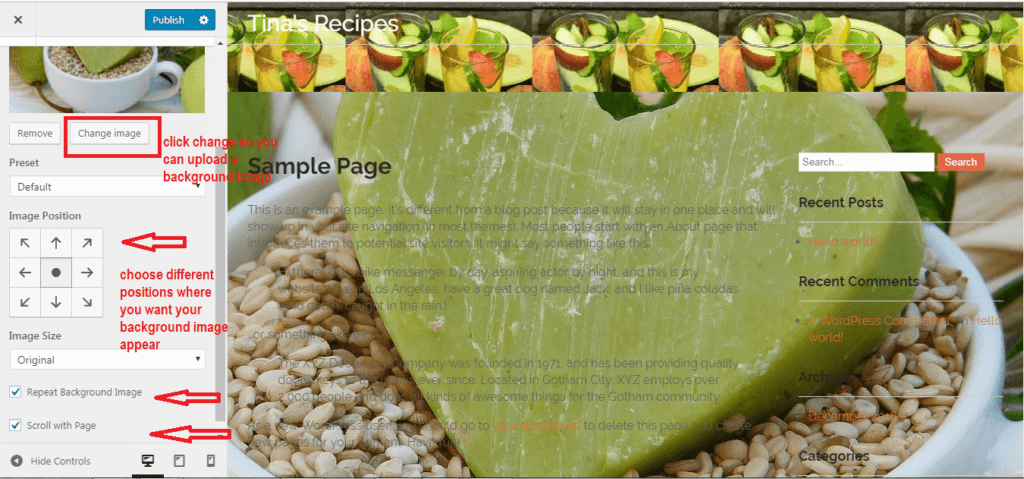
Background Image in your Siterubix Website
If you like to have a Background image in your Siterubix Site than you can upload one. Sometimes it looks not so good and the whole background looks then very busy.
If you have a family website a background image might be an excellent idea. You can see in the picture I used a background picture you can immediately see.
If the header image and the background image actually blend in it might not look too bad. When you change the background image you need to again upload it from your computer, phone or tablet. You will need to decide on the image position and on the image size. You can play around with it and check how it looks. There are quite a few possibilities. Be as creative as you want.
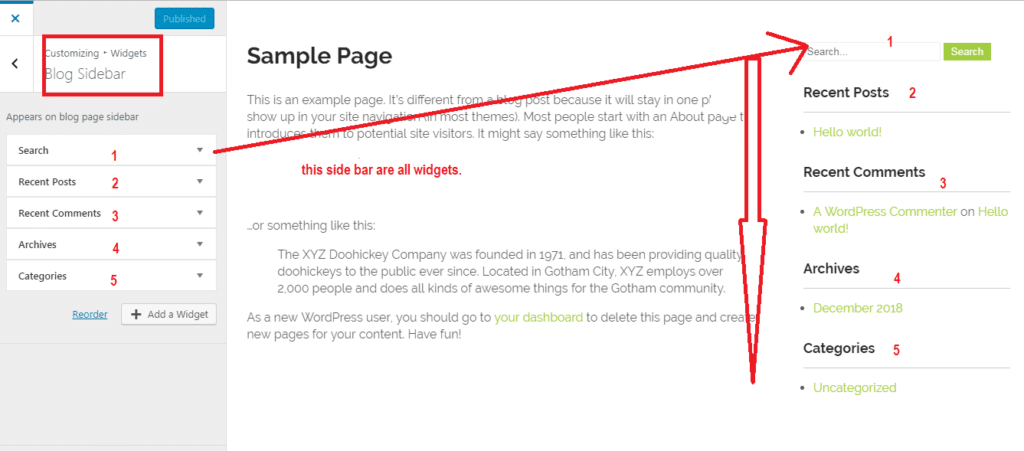
What is a Navigation Menu in a Website ( you are right it is nothing to eat)
A Menu in a Website, and how they are used at a most basic level of explanation is a collection of a list with links. Most of the Menus are on the site navigation area or on the header navigation bar.
It is usually called a Navigation Menu. Every Link in a Navigation Menu is called a menu item. I will not discuss this here further as in the Training you will be walked through by Kyle and you will know in detail how to create it.
The basic term is that you create a top menu and a bottom or side menu. It is done and when you customize your site for the first time you can skip it. When you build your Website you will need to build and create the Menus.
However, don’t worry you will have the training in your free training lessons. If you have not yet decided to sign up for the siterubix website builder then you can do it below. It is absolutely free…
Post or Homepage Settings in your SiteRubix Website

- You have the choice between homepage setting or post setting.
- What it means is that what is displayed on the homepage of your Website.
- If you choose post than the post will be in chronological order ( classic blog) or as a fixed/static page displayed.
- If you set it to a static homepage, you need to create the first two pages.
- Why two? Because one will become the homepage, and the other will be where your posts are displayed.
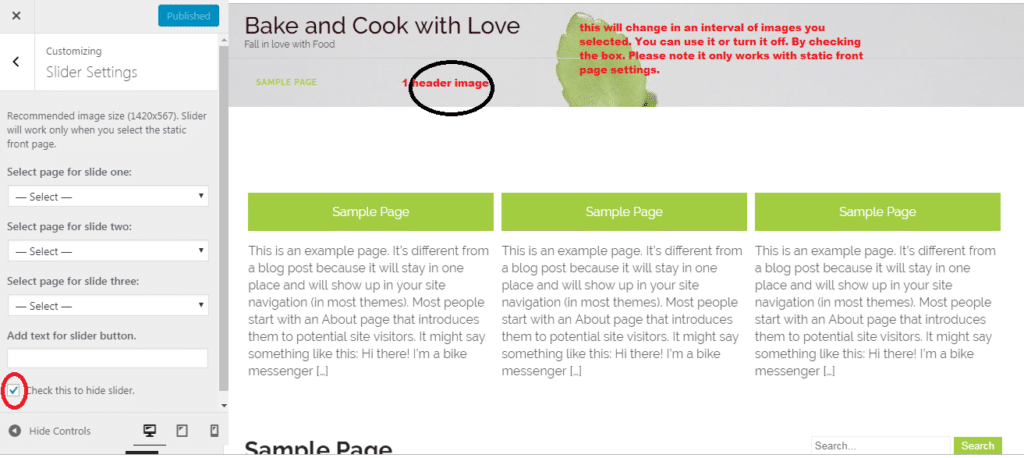
Slider setting in a free Website
Some Websites have Slider settings and some don’t have it always depends on your Theme. Some themes come with and some come without it.
Most of the slider settings require a special pixel size and will only work when you select the static front page. Your header picture will change in an interval of the pictures you chose.
Contact Details for a Website
In some themes, we have them on the header, on the side or sometimes on the footer. You can insert your contact details if you want to, and I would recommend a separate email address.
If you are using it as a family page than I would not fill out my contact page you want to avoid that spammers get hold of it and sending you Spam information or clogging up your inbox.
On the other hand, if you have a company website or a business website for your products you might want to let your customers know who you are and where are you located. Be reminded that whenever you insert some changes into your site use the publish button to save it.
Additional CSS on a Website
If you are wondering what is CSS here is an explanation of it. Every Cascading Style Sheet (whether it is contained in a .css file, or embedded in the head element of an HTML document) is a series of instructions called statements. A statement does two things.
a: it identifies the elements in an HTML document that it affects
b: it tells the browser how to draw those elements.
If you are new and not familiar with CSS, then I would recommend to wait and get all the other things set up. Your website is functioning OK even without the CSS. In the customize section you can learn how to do the CSS if you need to. But for a beginner start slowly and go step by step don’t overwhelm yourself.
I also have created a video and you can watch the video if reading is not your thing. People learn in different ways and some like the text some like the video.
Here is again the link if you have not signed up yet.
Let me know if you need some hand for creating your site in siterubix. I am sure and confident you will love the 10 absolutely free training lessons you are getting with the siterubix website builder.
Feel free to comment reading the blog “Create your brand new free website in less than 90 seconds, with the SiteRubix website builder” and tell us what was your experience when you created your first free website?
What has been your challenges?
Every one of us started as a Beginner. We all have to start somewhere.
Join the free starter Membership to create the website of your dreams.
All yours Sylvia
If you are interested in starting an online business then read my blog ” How on Internet Marketing part 1″
thanks for your tutorial this site siterubix
Hi
you are welcome. I find siterubix a great website builder especially as it comes with free training. When you are new to the whole thing of building a website it is not easy to find your way around. With the siterubix builder and the training, you are all set to go. The videos and training is on the spot and you do not waste time searching for tutorials you can get started right away.
Have a beautiful day
Sylvia